The gap between what a designer supplies and what a production team needs is where print jobs go wrong. File resolution issues, missing bleed, unconverted fonts, wrong colour spaces and embedded low-resolution logos create delays, compromises and reprints that are entirely preventable. This checklist covers the artwork preparation requirements for large format print production use it before submitting files and you will eliminate the vast majority of pre-press problems.
We provide pre-press checking and artwork preparation as part of every large format print job, but catching issues before submission saves time for everyone.
Key takeaways
- Supply artwork as PDF, TIFF, EPS or AI never as PowerPoint, Word or JPEG for production work
- Set up files at the finished output size (or a stated scale) in CMYK colour mode with bleed on all edges
- Convert all fonts to outlines (paths) before export missing fonts are the most common cause of text errors in production
- Embed all linked images at the appropriate resolution for the viewing distance (100-150 dpi at output size for most large format applications)
- Supply logos and graphic elements as vectors wherever possible rasterised logos degrade when scaled to large format sizes
- Include a visual reference (a low-resolution PDF or JPEG preview) alongside the production file so the print operator can verify the output matches your intent
File Format and Setup
The preferred file format for large format production is PDF/X-1a or PDF/X-4. These standards embed all fonts and images, convert colours to the correct space, and produce a self-contained file that will reproduce identically on any compliant output device.
If working in Adobe InDesign, export using the PDF/X-1a or PDF/X-4 preset. If working in Illustrator, save as PDF with fonts outlined and images embedded. If working in Photoshop (for photographic or textured work), save as TIFF with LZW compression and no layers.
Set up the document at 100% of the finished output size whenever practical. For very large formats (above 5 metres), set up at a convenient scale (1:2, 1:5 or 1:10) and state the scale clearly in the file name and on the artwork itself. Include a scale bar on the artwork so the print operator can verify the intended output size.
The document colour mode must be CMYK, not RGB. RGB files will be converted to CMYK during pre-press, and the conversion may shift colours particularly vibrant blues, greens and oranges that fall outside the CMYK gamut. Converting to CMYK yourself and verifying the colour on a calibrated CMYK preview is better than discovering the shift after production.
Bleed and Crop Marks
Bleed is the extension of the artwork beyond the finished trim size. It ensures that when the graphic is cut to size, there is no unprinted white edge visible. For large format work, include a minimum of 10mm bleed on all edges 25mm for very large formats or where the trim tolerance is wider.
Include crop marks (trim marks) that indicate the finished size. Position crop marks outside the bleed area so they are trimmed off. If the graphic will be hemmed (for fabric banners) or have a silicone edge (for tension frame displays), additional allowance beyond the standard bleed is needed your graphic supplier will provide the exact requirement for the specific hardware system.
For wall graphics and window vinyl that will be trimmed to an irregular shape on site, include a trim guide on a separate layer showing where the installer should cut. This is distinct from bleed it is a cutting instruction rather than a production tolerance.
Fonts: Outline Everything
Fonts that are not converted to outlines (also called “creating outlines” or “converting to paths”) will substitute to a default system font if the production system does not have the same typeface installed. This is the single most common artwork error in large format production, and it produces results ranging from subtle spacing changes to entire text blocks rendered in the wrong typeface.
In Illustrator: Select All → Type → Create Outlines. In InDesign: Export to PDF/X-1a (which embeds fonts) or use Edit → Find/Change to verify no missing fonts. In Photoshop: text is rasterised when the file is flattened, so font availability is only an issue in layered PSD files.
After converting to outlines, verify that the text appearance has not changed some typefaces shift slightly when converted, particularly at small sizes or with complex OpenType features. Save the outlined file as a separate version from your editable master file, as outlined text cannot be re-edited.
Image Resolution and Linking
For detailed resolution guidance by application and viewing distance, refer to our print resolution guide. The summary is: 100-150 dpi at output size for standard large format work (wall graphics, exhibition panels, POS display graphics), 50-100 dpi for medium-distance viewing (signage, hoarding, building wraps), and 25-50 dpi for long-distance viewing (billboards, stadium graphics).
When placing images in InDesign or Illustrator, embed them in the file rather than linking to external files. Linked files that are not packaged with the document create missing-image errors when the file is opened on the production system. If the file size is too large for embedded images, use File → Package (InDesign) to collect all linked assets into a single folder with the document.
Check the effective resolution of placed images this is the resolution after any scaling applied within the layout. An image placed at 300 dpi but scaled to 400% in the layout has an effective resolution of 75 dpi. InDesign’s Links panel shows effective resolution for every placed image.
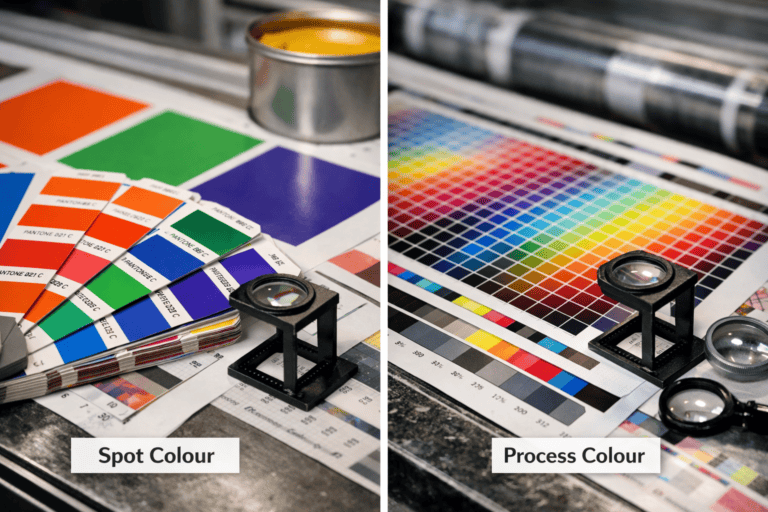
Colour: CMYK, Pantone and Special Requirements
Standard large format production uses CMYK process inks. Supply artwork in CMYK colour mode with the intended colour values. If specific colours must match a brand standard, include the Pantone reference on the artwork or in a separate colour specification document.
Be aware that CMYK gamut is smaller than RGB gamut. Colours that look vivid on an RGB monitor particularly electric blues, bright greens and saturated oranges may appear duller in CMYK print. Verify critical colours on a CMYK soft-proof or contract proof before production.
For colour-critical work (paint sampling, brand colour matching), supply physical colour references and spectral data rather than relying on CMYK values alone. Digital colour values are starting points, not absolute specifications the same CMYK formula produces different results on different substrates, inks and printers.
If the design includes white ink (for printing on transparent or coloured substrates), the white must be set up as a separate spot colour channel in the artwork. White ink is not produced by the absence of CMYK it is a physical fifth ink that must be specified explicitly. We will provide setup instructions for white ink artwork if your project requires it.
Logos and Vector Elements
Logos should be supplied as vector files (AI, EPS or PDF) wherever possible. A vector logo scales to any size without quality loss. A rasterised logo (JPEG, PNG) that looks acceptable at 100mm wide will show visible pixelation at 1,000mm wide unless the source resolution is very high.
If only a rasterised logo is available, supply the largest and highest-quality version you have. We can redraw logos as vectors for production use, but this adds time and cost. Most companies have vector logo files available from their design agency or brand team it is worth asking before accepting a rasterised version.
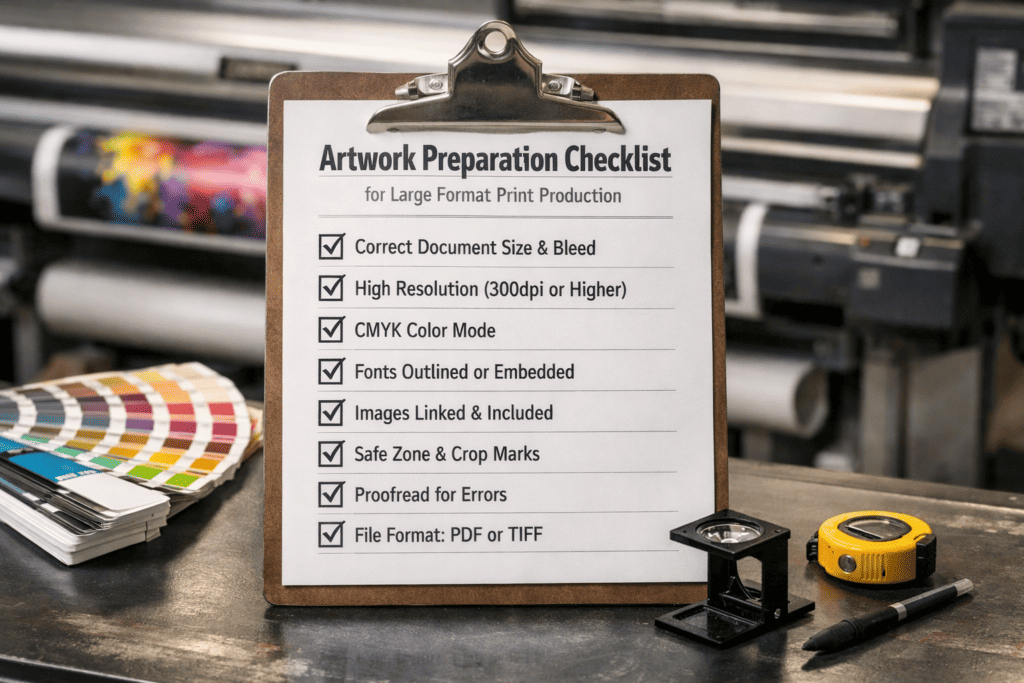
Pre-Submission Checklist
Run through this checklist before sending artwork for production:
File format: PDF/X-1a, PDF/X-4, TIFF, EPS or AI? ✓
Document size: Set to finished output size (or stated scale)? ✓
Colour mode: CMYK (not RGB)? ✓
Bleed: Minimum 10mm on all edges? ✓
Crop marks: Present and correctly positioned? ✓
Fonts: All converted to outlines? ✓
Images: Embedded (not linked), at correct resolution for viewing distance? ✓
Logos: Vector format? ✓
Pantone/brand colours: Referenced on artwork or in specification document? ✓
Visual reference: Low-res preview included for operator verification? ✓
If you are unsure about any aspect of artwork preparation, send us your files and we will check them during pre-press and advise on any adjustments needed.
Frequently Asked Questions
Can you accept PowerPoint or Word files for print?
We can work with them, but they are not production-ready formats. Colours are typically in RGB, images are compressed to screen resolution, and fonts may not transfer correctly. We convert these to print-ready formats as part of pre-press, but the conversion may require adjustments to layout, colour and image quality. Supplying print-ready files avoids this step.
What if my images are not high enough resolution?
We check resolution during pre-press and advise if any images fall below the threshold for the intended viewing distance. Options include sourcing higher-resolution originals, AI-enhanced upsampling for moderate shortfalls, adjusting the graphic size to suit the available resolution, or accepting a softer result at close viewing distances. We always flag the issue rather than printing without comment.
Do I need to supply a proof for approval?
We generate a digital proof from your production file for approval before printing. For colour-critical work, we can produce a physical proof on the production substrate. Approving the proof confirms that the artwork, layout, colour and specifications are correct once approved, production proceeds and any errors present in the approved proof are carried through to the finished job.
How do I set up artwork for double-sided printing?
Supply separate artwork for each side, clearly labelled as “Side A” and “Side B.” Ensure both sides are set up at the same dimensions with the same bleed. If the two sides need to register (align) with each other, indicate the registration requirements on the artwork and we will manage the alignment during production.
What is the maximum file size you can accept?
We can process files up to 10 GB, but files over 2 GB may require extended processing time. For very large files, use WeTransfer, Dropbox or a similar file sharing service rather than email. If the file is excessively large, it may be worth checking whether the resolution is higher than necessary for the viewing distance reducing resolution to the appropriate level will reduce file size substantially.
Can you colour match across different materials?
Yes. We maintain calibrated ICC profiles for every substrate we print on, and we can adjust profiles to achieve the closest visual match when the same design is printed across vinyl, fabric, foamex and other materials. Discuss this at the briefing stage so we can manage colour expectations across the different substrates.